Mobile Panel in SharePoint 2013

In my previous post on Device Channel, I explained how to create a device channel to target different devices. In this blog post, I will explain about Mobile Panels and Device Channel Panels and why to use them. I am going to explain a scenario which me and my friend worked on in order to have an understanding on the exact need for these panels.
There are times when you want to target only specific content of a page based on devices. Most of the times you might have noticed that many websites have a whole bunch of features when you have a look at the site in the desktop mode and have filtered set of features when viewed on mobile. View my blog at this link to have a detailed idea.

Thanks,

Geetanjali

Posted in SharePoint 2013 | Tagged , , , | Leave a comment

Device Channel in SharePoint 2013

Amongst many new features introduced in SharePoint 2013, one of the key features is Device Channel. With the continuous growth in the mobility sector, mostly smartphones are being widely used to  surf net. As a result, it is very important to provide a user friendly experience to any user visiting your website on mobile.

Microsoft has come up with the concept of Device Channels in SharePoint 2013. For all those who have not heard about Device Channels, I have explained it in my blog post posted here

Thanks,

Geetanjali

Posted in SharePoint 2013 | Tagged , , , | Leave a comment

Navigating to different URL from Desktop and Mobile View in SharePoint 2013

Recently, while incorporating device channels in SharePoint 2013 Online site, I came across a requirement where users were to be navigated to different pages for a particular menu item in the Top navigation. We were using Managed Metadata Navigation and the Top Navigation that was getting rendered was same for both desktop and mobile view. Since it was all dynamic so as per my understanding the option we had was to change this navigation at runtime on the fly. Out of various options that might be available for this, the simplest to me seemed to be dynamically change the URL using Jquery and CSS.

Refer to this link where I have explained in detail as to how this can be achieved.

Thanks,

Geetanjali

Posted in SharePoint 2013 | Tagged , | Leave a comment

Unexpected response from server. The status code of response is ‘0’. The status text of response is ”

Recently while working with ECMASCRIPT I came across an issue that stated “Unexpected response from server. The status code of response is ‘0’. The status text of response is ”. Now, I got this error in the error logger list which is a custom list that we created to log any exceptions that arise.
To my utter surprise, I was not able to reproduce the issue at my local environment as well as production site and no complaints of any broken functionality also came from the client. But randomly this error was getting logged in the logger list. This made me think as to what could be the cause of the issue. I tried various ways to reproduce this error and voila, I was able to get to this error when I navigated to some other page before the asynchronous call that my ecmascript code was making had completed. I tried this a couple of times and everytime I navigated to the other page before the call had completed, I got this error logged in the logger. This way I could understand as to why this happened.
After some more analysis, I found out that status code 0 comes when you make an ajax call and refresh the page or navigate to some different page without getting the ajax response. So for all my dear friends out there, if you ever come across this random weird error, then probably it is because your asynchronous call was cancelled before getting the response. Hope it gives some pointer.

Posted in Uncategorized | Leave a comment

Hiding links in Welcome Control in SharePoint 2013

Lately, I came across a requirement around hiding the “About Me” link in the welcome control dropdown. The simplest and quickest solution that seemed to me was to play some tricks using css. To read more on this follow my post on the link

Hope you found it helpful.

Thanks,

Geetanjali

Posted in SharePoint 2013 | Tagged , , | Leave a comment

SharePoint 2013 and Maximum Degree of Parallelism

Yesterday while installing SharePoint 2013 on production environment I encountered an issue stating that
“This SQL Server instance does not have the required “max degree of parallelism” setting of 1. Database provisioning operations will continue to fail if “max degree of parallelism” is not set 1 or the current account does not have permissions to change the setting.”

Now, this is weird. I was simply trying to run a Powershell script for creating the Configuration as well as Other Content DB’s required for my SharePoint Installation. I tried to run the SharePoint Configuration Wizard , which I was pretty sure would not work for me. And I was right. Boom the error came with the Configuration Wizard as well.

ConfigFailed

I tried to do some research across what this error actually mean and why I am getting this error.

It is important to note here that , if you are running the wizard for the first time itself with a user account that has sysadmin rights on SQL Server, then it will automatically make these changes in the SQL and you will not be required to do any of the below mentioned steps that I will be explaining shortly.

First , for all those, who are not aware of what maximum degree of parallelism means (just like me :p), I would explain what it means and then I will explain the error.

Maximum Degree of Parallelism –
It means number of processors that SQL Server use for one query. If SQL has to return lot of records then if we use the concept of Parallelism , then it breaks the query into smaller queries and each small query returns a subset of the records. All these queries run parallely on different threads.

By default the Maximum Degree of Parallelism is set to 0. It means that SQL can use all the processors available to execute a single query.

The decision whether to follow the Parallel Exceution Plan or Serial Execution Plan depends upon scenario to scenario. In case of OLTP systems, where queries are relatively smaller and they return less number of records, it is best to follow Serial Plan with Maximum Degree of Parallelism set to 1. However, in case of OLAP systems, where the queries are quite complex, it is preferable to go for Parallel Execution Plan with Degree of Parallelism set to 0.

Parallel Execution Plan has its own set of advantages and disadvantages. At one place it increases the query execution time and on the other hand, by using multiple CPU’s to execute single query, it consumes lot of CPU’s as a result increasing CPU utilization. The same query may take different intervals at different time. As a result, query time is non-deterministic.

I hope, now you might have got some basic idea as to what Maximum Degree of Parallelism is. Coming back to SharePoint, in SharePoint 2010, setting Maximum Degree of Parallelism option was recommended to be set as 1 , but is was optional and not mandatory.
However, in case of SharePoint 2013, it is required to set this to 1 otherwise the configuration wizard will fail.

Below are the detailed steps :-

  1. Check in SQL Sever, whether the Configuration Database exists. If it exists then delete it.
  2. From SQL Server Management Studio, right click on your server and click Properties.
  3. Under Advanced group, modify the value of Maximum Degree of Parallelism to 1.

Maxdop


 4. Run the configuration wizard again.

Now, you will successfully be able to run the wizard.

Cheers,

Geetanjali


Posted in SharePoint 2013 | Tagged , | Leave a comment

Configuring Anonymous Access in SharePoint 2013 and JavaScript Client Object Model

Recently I came across a requirement to enable anonymous access for SharePoint 2013 site. Now, this seems to be a very simple requirement but the twist here was that anonymous access should work with ECMASCRIPT. Had it been server side code, we could have simply executed our code within run with elevated privilleges and thats it. But with javascript, this is not possible. In this blog post I will explain how this can be achieved.

First of all, for anonymous access to work , we need to enable anonymous access at both web application level as well as site collection level.

In central admin, when we are creating a new web application, we get an option to make the web application  available anonymously.

AnonAccessCentralAdmin

Next thing required is that we need to set up the anonymous access at the site collection level. To do this , we need to go to Site Settings -> Site Permissions. There we find an option for Anonymous Access. Clicking on that will provide us a popup where we can enable anonymous access for the site collection.

site_coll

The above two steps would have been enough for server side code. But if you are working with Javascript Client Object Model, there are additional things that needs to be done before being able to access a site anonymously.
With JavaScript Client Object Model (JSCOM), the anonymous user gets Microsoft.SharePoint.Client.ApiBlockedException. As a result when user tries to access a site anonymously where something is being fetched based on JSCOM, he will get Access Denied Exception because of the blocked API. The solution for this problem lies hidden in the ClientCallableSettings of the SPWebApplication object. This property controls which API are prohibited in the Client OM. With the help of powershell we can remove these blocked API’s from the web application.

powershell

If you look at the above powershell script, you will see SPList in AnonymousRestrictedTypes. In Client Object Model, the following API’s are restricted in ClientCallableSettings

  • SPSite.GetChanges()
  • SPWeb.GetChanges()
  • SPWeb.GetSubwebsForCurrentUser()
  • SPList.GetChanges()
  • SPList.GetItems()

It is the restriction on GetItems() that prevents the anonymous users from fetching listitems using JSCOM.
Therefore we need to remove this restriction in order to enable anonymous access. Following powershell command will remove this restriction on web application level

powershell_anon

By running the above command we can get away with the API restriction on GetItems() in case of Client Object Model.

Now, the next thing that needs to be done is to go to central admin. There go to Application Management and select Manage Web Applications. Select your web application and click on the Authentication Providers in the ribbon.It will open a dialog box as shown below.

authenticationProviders

Click on Default link. It will open another dialog box. There you will find an option saying Require Remote Interfaces Permission. Uncheck this checkbox and save.

remoteapi

Now, your site is configured to support anonymous access with Javascript Client Object Model with anonymous users having View Item permission on the list. In case you want to allow anonymous users to perform some POST action as well, like Add an Item to the list , you need to break permission inheritance and give Add Items permission as well to anonymous users.

listanonymous


And this is it. Now anonymous users can GET and POST data to sharepoint site using JSCOM.

Hope this helps !!

Cheers,
Geetanjali

Posted in SharePoint 2013 | Tagged , , | Leave a comment

Configuring Navigation Settings in Sandbox solution

Hello Kind Readers,

Recently I came across with a scenario where I had the requirement to configure the Navigation Settings (available in the Look And Feel section) so as to have different quick launch or current navigation for different subsites. It seemed to be a quite simple task where you can make use of the PublishingWeb class and set the desired properties to configure global as well as current navigation.

navigation


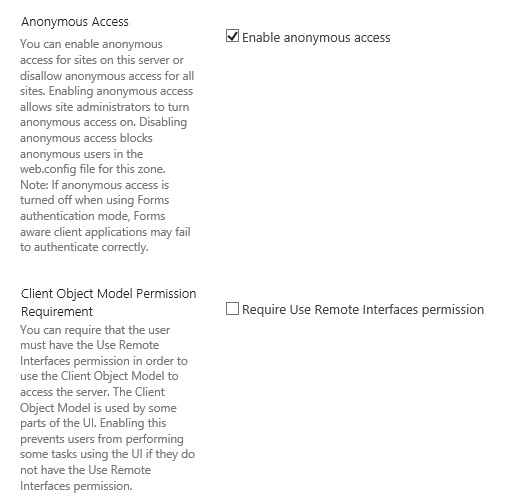
The above image shows the Navigation option in the Look and Feel section in site settings.


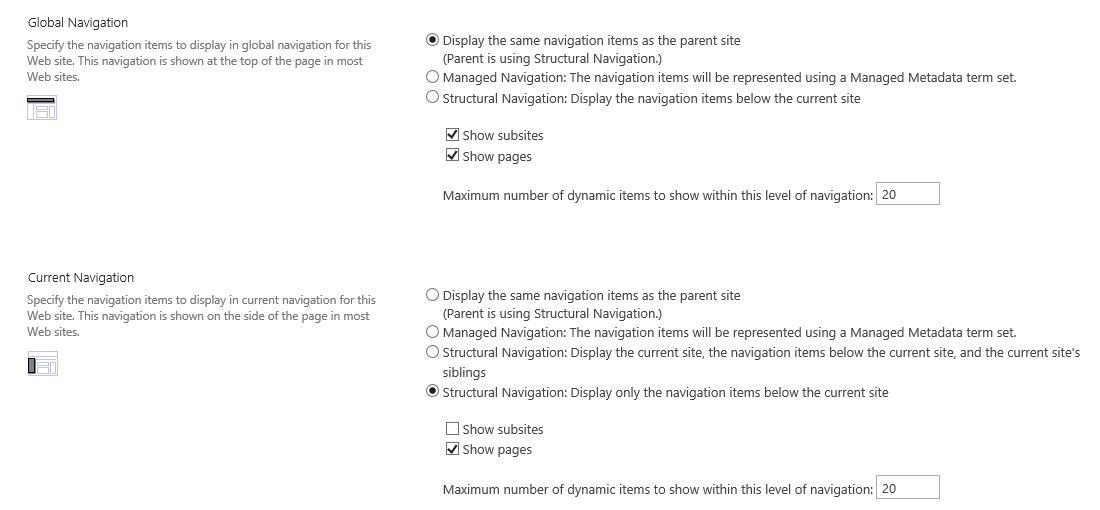
The below screenshot shows the navigation settings page from where the user can manually configure the navigation options.

navigationsettings


Following piece of code briefly explains how this can be done


PublishingWeb pubWeb = PublishingWeb.GetPublishingWeb(currentweb);

//Include pages in the quick launch

pubWeb.Navigation.CurrentIncludePages = true;

//Include subsites in the global nav

pubWeb.Navigation.GlobalIncludeSubsites = true;

But here comes a twist when you work as a part of sandbox solution. The PublishingWeb class is a part of the Microsoft.SharePoint.Publishing assembly which is not available in sandbox. As a result, you cannot use this class to configure the navigation settings. Then how can we configure these settings in the sandbox solution.

After much exploring through reflector and sharepoint manager, finally sharepoint manager came to my rescue. I tried to do the settings through UI and observed what was happening behind the scenes to the various properties of SPWeb property bag. My findings were that there are few properties like below whose value changes when we modify the various settings in the Navigation Settings page.

sharepointmanager


__CurrentNavigationIncludeTypes :- The value of this property changes when we try to select the     various options in the Current Navigation section. The various possible options are 0, 1, 2, 3

0 indicates that in structural navigation , nothing is selected

1 indicates that in structural navigation, Show Subsites is checked and Show Pages is unchecked

2 indicates that in structural navigation, Show Subsites is unchecked and Show Pages is checked

3 indicates that in structural navigation, Show Subsites is checked and Show Pages is also checked

__GlobalNavigationIncludeTypes :- The value of this property changes when we try to select the various options in the Global Navigation section. The various possible options are 0,

0 indicates that in structural navigation , nothing is selected

1 indicates that in structural navigation, Show Subsites is checked and Show Pages is unchecked

2 indicates that in structural navigation, Show Subsites is unchecked and Show Pages is checked

3 indicates that in structural navigation, Show Subsites is checked and Show Pages is also checked

__InheritCurrentNavigation :- This property if set to true inherits the parent navigation in the child web.

__NavigationShowSiblings :- This property is a boolean value that represents whether the web should display the siblings.

__IncludeSubSitesInNavigation :- This property is common to both global navigation as well as current navigation. As the name suggests, it will include subsites in the global as well as current navigation.

__IncludePagesInNavigation :- This property is common to both global navigation as well as current navigation. As the name suggests, it will include all the pages in the global as well as current navigation.

Now, in my scenario, the global as well as current navigation was supposed to be different. Following is the piece of code

public const string InheritCurrentNavigation = “__InheritCurrentNavigation”;

        public const string CurrentNavigationIncludeTypes = “__CurrentNavigationIncludeTypes”;

        public const string NavigationShowSiblings = “__NavigationShowSiblings”;


        public override void FeatureActivated(SPFeatureReceiverProperties properties)

        {

            try

            {

                SPWeb web = properties.Feature.Parent as SPWeb;


                if (web.IsRootWeb != true)

                {

    //Set child web not to inherit from parent web

                    if (web.GetProperty(InheritCurrentNavigation) != null)

                    {

                        web.DeleteProperty(InheritCurrentNavigation);

                        web.AddProperty(InheritCurrentNavigation, bool.FalseString);


                    }

                    else

                    {

                        web.AddProperty(InheritCurrentNavigation, bool.FalseString);


                    }

    if (web.GetProperty(NavigationShowSiblings) != null)

                    {

                        web.DeleteProperty(NavigationShowSiblings);

                        web.AddProperty(NavigationShowSiblings, bool.FalseString);


                    }

                    else

                    {

                        web.AddProperty(NavigationShowSiblings, bool.FalseString);


                    }


    //Setting the current navigation to show only pages

                    if (web.GetProperty(CurrentNavigationIncludeTypes) != null)

                    {

                        web.DeleteProperty(CurrentNavigationIncludeTypes);

                        web.AddProperty(CurrentNavigationIncludeTypes, 2);


                    }

                    else

                    {

                        web.AddProperty(CurrentNavigationIncludeTypes, 2);


                    }

                    web.Update();

                }

            }

            catch (Exception ex)

            {

            }

        }

With the help of above properties, you can easily configure navigation settings in a sandbox solution as well. You can explore more properties with the help of SharePoint Manager. Hope this helps. 🙂

Cheers,

Geetanjali

Posted in SharePoint 2010 | Tagged , , | Leave a comment

Multi-tenancy in SharePoint 2010

SharePoint 2010 provides some new features to support Hosting Environment, in simple terms Multi-tenant support. Multi-tenancy is all about of isolation of data , services, administration etc. It involves a unique deployment for a customer/tenant on a shared set of resources. In multi-tenancy, we have multiple customers/tenants who share the same infrastructure, some shared services with no data and some shared services with patitioned data. In 2007, there were some inherent problems while doing Multi-tenancy and true isolation was not possible but in 2010 the limitations were overcome and we have a beautiful Multi-tenant feature available for us to be leveraged to our customers.

Now the most important thing is Why Multi-tenancy ?

As you have read , multi-tenancy involves sharing of resources that means we have less hardware cost.

Its like a pooling of a car where the same amount of petrol is being used to reach from source to destination but shared among every person sitting in the car thereby being cost effective. So, we share resources with other tenants. But the beauty here is that there is complete isolation of data. Consider a scenario, there are 5 schools who have a SharePoint portal for their students. They have the same features deployed and configured on their portal. The only difference is in the data, they all have different students accesing the same. So, here we can set up a multi-tenant hosting enviroment for all the 5 schools, where they will be using the same infrastructure but will have complete isolation of data from each other. They all will have a single User Profile Service Application which will be  available in partitioned mode so that student from School 1 cannot access the portal of School 2. Also there is a centralised control over hardware. Now to manage 5 customers, we don’t have to manage 5 independent infrastructures. We simply need to manage one. 🙂

Also there is an admin site available in multi-tenant environment for each tenant where he can create new sites and perform administration stuff. If you remeber, i normal SharePoint environment, if we were using User Profile Service Application, then in order to manage any user profile we simply used to go to the Central Admin Manage Profiles, and there we had that beautiful option to Manage User Profile. But this is not available in Multi-tenant because we don’t want admin from one school sees the users of the other school or to isolate one tenant data from the other tenant. Here comes the tenant admin site in picture. For every tenant, in their admin site, they have the provision to manage user profiles. So this feature is available in tenant admin site instead of the Central Admin to ensure isolation.

normalhosting_png

In the above screenshot, if you see there are 4 customers i.e. 4 independent web-applications in 4 different sharepoint farms. This is the scenario where we are provisioning one farm per customer.

multitenant_png

However in this second screenshot, we have a single farm whoch host all the 4 customers for us. These customers are called tenants, who share the same services but in partitioned mode.

Also there is a very important term in multi-tenancy and that is Site Subscription. Site subscription is the logical grouping of site collections that can share resources. Now, each tenant has a subscription ID that differentiates it from the other tenant. The subscription ID is used to map features, services, and sites to tenants and also to partition service data according to tenant. Now, these site subscriptions can be created using powershell or using object model.

There is also a new concept that is introduced with multi-tenancy and that is the Feature Pack. If you create any feature in multi-tenant environment, then that feature is not available in the default list of your features available in your web or site scoped features. To make your feature available there you need to create a feature pack and include your feature in the feature pack and then associate that feature pack with your tenant. This concept is very interesting in terms that you can provide different features to different tenants in an ala-carte manner. I will write a new blog post solely on feature packs later.

So, these are the very basics of multi-tenancy in SharePoint 2010. I hope after reading this blog post you will get some basic idea around this concept.

Cheers,

Geetanjali

Posted in SharePoint 2010 | Tagged , | Leave a comment

Firing events inside a modal dialog in SharePoint 2010

Lately I came across a requirement where I had to fetch user input and based on that perform some validations on the click event. All of this was supposed to happen inside a modal dialog inside SharePoint 2010. Initially it seemed quite simple but when I started to do it I really had to struggle to get the click event functional inside the modal popup.

Before diving more into the issue let me brief you about the Modal dialog in SharePoint 2010. It is a new dialog framework that is provided using javascript client object model. You must have seen a dialog box that opens up on editing a list item or adding a new item with some lightbox effect. That is what I am talking about here. 🙂

Diving into some more details here, the javascript client object model has a class SP.UI.ModalDialog that has quite a number of useful methods that help us interact with the dialog framework. One such useful method is the showModalDialog() that accepts a parameter of an object named options.
This options is the heart of this method.

var options ={
url: ‘some url’,
title:’SharePoint 2010 Modal Dialog’,
width:100,
height:150,
dialogReturnValueCallback: closeDialog
};

Now if you have a look at above code snippet, it is quite simple and clear.

url : url of the page that appears in the dialog
title: title of the dialog box
width: width of the dialog box
height: height of the dialog box
dialogReturnValueCallback: It is the return callback function.

To show the dialog box you need to do the following

SP.UI.ModalDialog.showModalDialog(options);

Now , if you can recall, above I mentioned that url is the url of the page that gets displayed in the modal dialog. But there is one more option available here. We have an option called html as well where we can specify the html of that we want to show in the dialog box.

There are many more options that are available OOB that you can refer from msdn.

Coming back to my requirement, I had to take an input from the user and on the click event perform some validations inside the modal dialog. Also in my dialog I was using the html attribute of the options rather than showing some page. Now the problem with this was how to bind the script that will perform my onclick event inside the html markup. The html string is simply not a string but the DOM element that we will be showing in the dialog.

Now, the way it works is that we need to do document.createElement to create the DOM elements in memory. I did the document.createElement for my parent div container and added rest all child elements inside it as a template. But my on click event was not working. So I realised that I need to do document.createElement for script as well.

It made me think that if we are going to do document.createElement for every element then it will be really painful. So I did some R&D and came across an interesting blog where the approach suggested was to put the markup in the script tag with attribute set as “text/html”. After that create the DOM in the memory using Jquery with the help of the markup specified in the script tag.

Here interesting thing is using type as “text/html” . If we put unsupported types in the type attribute for the script then the content of the script is ignored. This is normally used to render data that is not loaded to the page. This type of script is treated by browse as a div with style= display:none.

So, enough talking and lets have some practical implementation

function CheckValidations() {

//Logic to check the validations

}

function openDialog() {
var options = SP.UI.$create_DialogOptions();
options.title = “Save Image”;
options.width = 400;
options.height = 250;
options.html = createHtml();

SP.UI.ModalDialog.showModalDialog(options);
}

function createHtml () {

var htmlDiv= jQuery(jQuery(‘#parentDiv’).html());
htmlDiv .find(‘#btnOk’).on(‘click’, function () {
CheckValidations();

});

return htmlDiv .get(0);
}
//The markup will be something like below

<script type=”text/html” id=”parentDiv”>
<div>
<label for=”PictureName”>Picture Name :</label>
<input type=”text” id=”txtPictureName”/>
<input type=”button” id=”btnOk” value=”Ok”/>
<div id=”errorDiv” ></div>
</div>
</script>

Now from your code wherever you want to open this dialog, on the click event simply call the openDialog() method and you are good to go.

Posted in SharePoint 2010 | Tagged , | Leave a comment